Use fast glass, high ISO, steady technique, and patient timing to capture sharp low-light wildlife images.
I’ve spent years chasing birds and mammals at dawn and dusk. This guide shows how to photograph wildlife in low light with clear gear choices, camera settings, field tips, and editing tricks. Read on for step-by-step advice that I use in the field and teach to others.

Gear essentials for low-light wildlife photography
How to photograph wildlife in low light starts with the right gear. Pick a camera that handles high ISO well and a lens with a wide aperture. Good gear gives you more margin for error in dim light.
Choose a body that excels in low light
- Full-frame sensor: Better low-light performance and less noise at high ISO.
- High native ISO range: Allows cleaner images when light is scarce.
- Fast burst mode: Helpful for quick wildlife action in low light.
Pick lenses that match your subjects
- Fast prime or zoom: f/2.8 or wider helps a lot when light is low.
- Long reach: 300mm to 600mm helps with shy animals.
- Stabilized glass: Lens stabilization can cut camera shake when light is low.
Support and accessories matter
- Sturdy tripod or monopod: Keeps shots steady during long waits.
- Gimbal head or bean bag: Makes tracking easier and safe for wildlife.
- Extra batteries and memory cards: Cold and long sessions drain power fast.
Personal tip: I often carry two bodies with different lenses. This saves time when light changes and wildlife appears fast.

Camera settings that work best in dim light
How to photograph wildlife in low light depends on smart settings more than fancy gear. Use settings that balance sharpness, noise, and motion.
Shutter speed basics
- Aim for a shutter speed that freezes subject motion. For birds, start at 1/1000s when possible.
- For slow animals, 1/250s to 1/500s can work with a long lens and stable support.
- If you must lower shutter speed, brace your camera or use stabilization.
Aperture and depth of field
- Use the widest aperture your lens allows for light (f/2.8 to f/5.6).
- Wider aperture reduces depth of field. Focus carefully on the eyes.
- Stop down slightly if you need more depth and light still allows.
ISO and noise control
- Raise ISO to keep shutter speed and aperture in range.
- Modern cameras can handle ISO 3200 to 12800 with usable results.
- Use noise reduction in post only when needed.
Autofocus and exposure modes
- Use continuous autofocus for moving subjects.
- Choose aperture priority or manual mode for control.
- Expose to protect highlights—blown highlights in an eye ruin images.
Real-world note: I often start at ISO 3200, f/2.8, and 1/500s for twilight raptor work. Adjust from there.

Lenses and stabilization for sharper low-light shots
How to photograph wildlife in low light improves when you match lens choice and support to the scene. The right lens and stable support cut blur and let you use lower ISO.
Lens tips
- Fast prime lenses give great light and image quality at wide apertures.
- Telephoto zooms are versatile for changing distance to subjects.
- Consider weight: heavy lenses mean more support is needed.
Support options
* Monopod for mobility and steady support when tracking.
- Tripod with a gimbal head for long waits and heavy lenses.
- Bean bags or vehicle windowsill setups for quiet, low-angle shooting.
Image stabilization and techniques
- Use lens or body stabilization when handholding.
- Turn off stabilization on a tripod if it causes blur.
- Practice bracing and breathing control for hand-held shots.
Personal lesson: I once ruined a dawn session by skipping a monopod. Afterwards I use a lightweight support on every low-light outing.
Focusing strategies and exposure tricks in low light
How to photograph wildlife in low light is as much about focus technique as it is about gear. Good focus habits increase keep rates dramatically.
AF mode and points
- Use continuous AF (AF-C) when subjects move.
- Choose a single flexible focus point for precise eye focusing.
- Expandable points help when the subject moves unpredictably.
Back-button focus and tracking
- Back-button focus separates focus from shutter release for better control.
- Use tracking modes and subject recognition if available.
- Re-focus often on small, fast targets like songbirds.
Metering and exposure aids
- Use spot or center-weighted metering on subjects.
- Slight exposure compensation may be needed to keep animals from underexposing.
- Take test shots and check histograms for clipped highlights or lost shadows.
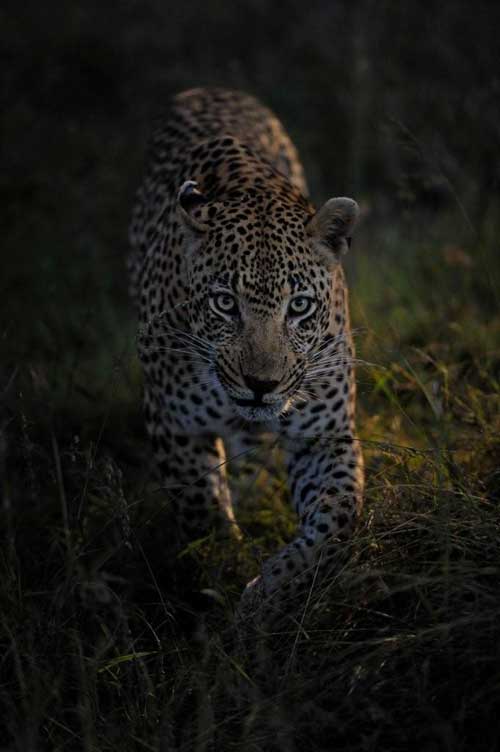
Practical tip: When light is low, focus on the eye first. If the eye is sharp, viewers forgive slight motion blur elsewhere.

Lighting, timing, and composition for low-light wildlife
How to photograph wildlife in low light also means learning light and timing. The best color and mood often come at sunrise and sunset.
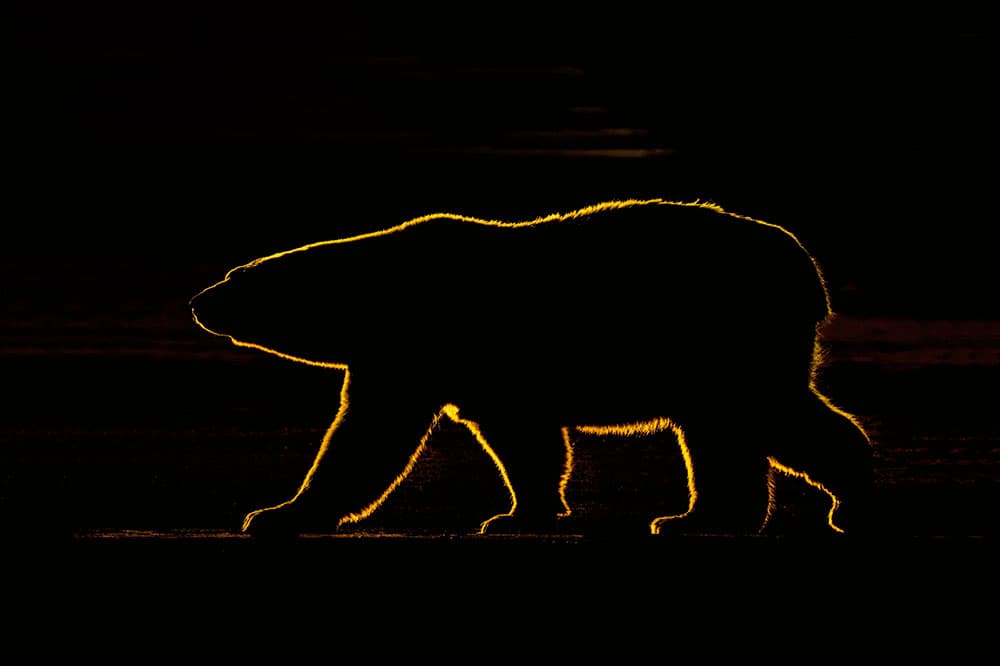
Work the golden and blue hours
- Shoot at dawn and dusk for warm light and gentle contrast.
- Blue hour adds mood for silhouettes and behavior shots.
- Know species habits to time your session for peak activity.
Use natural reflectors and backlight
- Use water and bright ground as natural reflectors to brighten subjects.
- Backlight can rim the animal and separate it from the background.
- Avoid direct front flash unless it won’t disturb wildlife.
Compose for impact
- Focus on clean backgrounds and eye-level shots.
- Include habitat to tell a story about the animal.
- Leave negative space for movement and direction.
Field story: I once captured an owl at dusk with rim light on its feathers. The backlight made the image feel alive, despite low shutter speed.
Field techniques, patience, and ethical rules
How to photograph wildlife in low light requires patience and respect. Quiet, slow moves and ethical choices yield better shots and protect animals.
Approach and concealment
- Move slowly and low. Use natural cover to close distance.
- Wear muted clothes and avoid strong scents.
- Use hides or vehicles for wary species.
Behavior and safety
- Learn species habits to predict movement and light windows.
- Keep a safe distance and never stress animals for a photo.
- Know local rules about flash, baiting, and nighttime approaches.
Patience and timing
- Arrive early and plan long waits; low-light windows are short.
- Expect misses. The more time you spend, the better your luck.
- Use continuous shooting to capture the right moment.
Personal note: My best low-light shots came after long cold waits. Patience beats perfection in gear every time.

Post-processing tips for low-light wildlife photos
How to photograph wildlife in low light continues in post. Editing helps control noise, sharpen, and bring out detail safely.
Noise reduction and sharpening
- Apply targeted noise reduction in shadows first.
- Preserve detail in the eyes with careful sharpening.
- Avoid over-smoothing fur or feathers—this kills texture.
Color and exposure adjustments
- Raise shadows modestly and protect highlights.
- Use local adjustments to brighten eyes and faces.
- Maintain natural colors; push warmth sparingly for mood.
Crop and final touches
- Crop to improve composition and remove distractions.
- Clone out small sensor dust or distracting branches.
- Export at sizes that keep detail for web or print use.
Workflow tip: I create a low-light preset that preserves detail and reduces noise. Then I tweak per image for best results.

Common mistakes and how to avoid them
How to photograph wildlife in low light means avoiding common errors. Learn these early to save time and shots.
Mistakes to avoid
- Underexposing to avoid noise, then losing detail in shadows.
- Using too slow a shutter and blowing away sharpness.
- Forgetting extra batteries and losing chances as light fades.
How to fix them
- Keep exposure balanced—use higher ISO rather than very slow shutter.
- Stabilize your camera and test shutter speeds that work.
- Pack spares and a simple checklist for low-light shoots.
Lesson learned: Early in my career I underexposed to save highlights and lost detail. Now I aim for a clean exposure even if it means more noise later.
Frequently Asked Questions of how to photograph wildlife in low light
What shutter speed should I use for fast birds at dusk?
For fast birds, aim for 1/1000s or faster when possible. If light won’t allow that, use stabilization and higher ISO to keep speeds above 1/500s.
How high can I push ISO for wildlife shots?
Many modern cameras handle ISO 3200 to 12800 well. Test your camera to find the highest ISO with acceptable noise for your needs.
Is flash okay for low-light wildlife photography?
Avoid flash with wild animals unless rules and welfare allow it. Flash can startle animals and alter behavior. Use ambient light and long lenses instead.
How do I get sharp eyes in low light?
Use a single focus point on the eye, continuous AF for moving subjects, and the widest aperture you can manage while keeping depth of field on the eye.
Should I use a tripod or monopod in low light?
Both help. Use a tripod for long waits and a monopod for mobility and tracking. Choose based on how you move and your subject’s behavior.
Conclusion
You can learn how to photograph wildlife in low light with the right gear, smart settings, steady support, and a lot of patience. Start with a fast lens, raise ISO thoughtfully, focus on the eye, and respect wildlife while you shoot. Try the tips in this guide on your next dawn or dusk outing and review your shots afterward to refine your approach. Share your results, ask questions, or subscribe for more wildlife photography tips.
